


Remote Development in Sagemaker Studio with VS Code

Disclaimer about Changes to Sagemaker Studio
As of Nov. 30 2023, there have been major changes to Sagemaker Studio. Existing customers of Sagemaker Studio will get the default experience now called Sagemaker Studio Classic — this is the Studio experience this article was written for.
New Sagemaker Studio customers (and existing customers that choose to update their existing domains) will get the new Sagemaker Studio experience. This includes Code Editor which is based on Visual Studio Code – Open Source.
Introduction
Note: I will be using the term Sagemaker Studio throughout the article and this is referring to Sagemaker Studio Classic.
This article is a guide to getting remote development to work between VS Code and Sagemaker Studio using AWS Systems Manager. The general idea is that you can have data scientists working inside Sagemaker Studio in a locked-down AWS account (no external internet access), but still take advantage of the comfort of working within their local VS Code client.
You get the comfort of working in a local IDE with the power of developing inside Sagemaker Studio and all its AWS integrations.
It is thanks to this library: https://github.com/aws-samples/sagemaker-ssh-helper that this process is relatively straightforward.
A GitHub repository for this demo is located at sagemaker-remote-demo. It contains the necessary AWS CDK code to set up a VPC, Sagemaker Studio, and Sagemaker execution role with the required permissions. The README in the repo also contains more detailed information for a more line-by-line style of instructions if you find these inadequate.
Below is the end result:
Note: To keep things simpler for myself, I was using a client role (assumed locally) with admin privileges. So in this case, the client-side IAM policy for this process didn’t come into play. Ordinarily, you would be using a more restrictive role with a proper sshClientPolicy attached.
Overview
Sagemaker Studio is a part of the broader AWS Sagemaker service. It provides a web-based unified Integrated Development Environment (IDE) for machine-learning.
It is essentially a modified JupyterLab environment that integrates nicely with many AWS services, offering some ML-related functionality for the various stages of the machine-learning lifecycle (model-registry, pipelines, etc).
However, the out-of-the-box development experience is lackluster compared to using your favorite IDE. This can likely be solved by installing Jupyter extensions, but if you have no external internet access within the VPC, then this can involve some extra ongoing work for individuals supporting Sagemaker at your organization.
Fortunately, we can take advantage of the awesome VS Code Remote extension that uses SSH port-forwarding, allowing you to use a local VS Code client to do some remote development on your Studio notebook instance.
Note: scp stands for Secure Copy Protocol and is used for copying data over an ssh connection.
Some benefits of this approach:
- Your local VS Code client is still configured exactly how you like it.
- The VS Code server is installed on the studio notebook instance via
scp - VS Code Extensions can be installed on the remote instance via
scp - Increased security – works with no external internet access allowed in or out of your VPC. No internet gateway greatly reduces security risks.
Prerequisites for using this approach:
- AWS CLI v2 installed: Install or update the latest version of AWS CLI
- AWS CLI session manager plugin: Install the session manager plugin
- AWS account with Sagemaker Studio properly setup (domain, roles, permissions, endpoints)
- AWS Systems Manager: Advanced-instances tier turned on
- VS Code with Remote-SSH extension installed
- Remote.SSH: Local Server Download setting in VS Code set to
autooralways– This enforces that the data needed to install the VS Code server is uploaded from your local machine viascpinstead of via the internet.
Here is the general outline of what our setup will look like (this costs about $6 per day if run for the whole day)
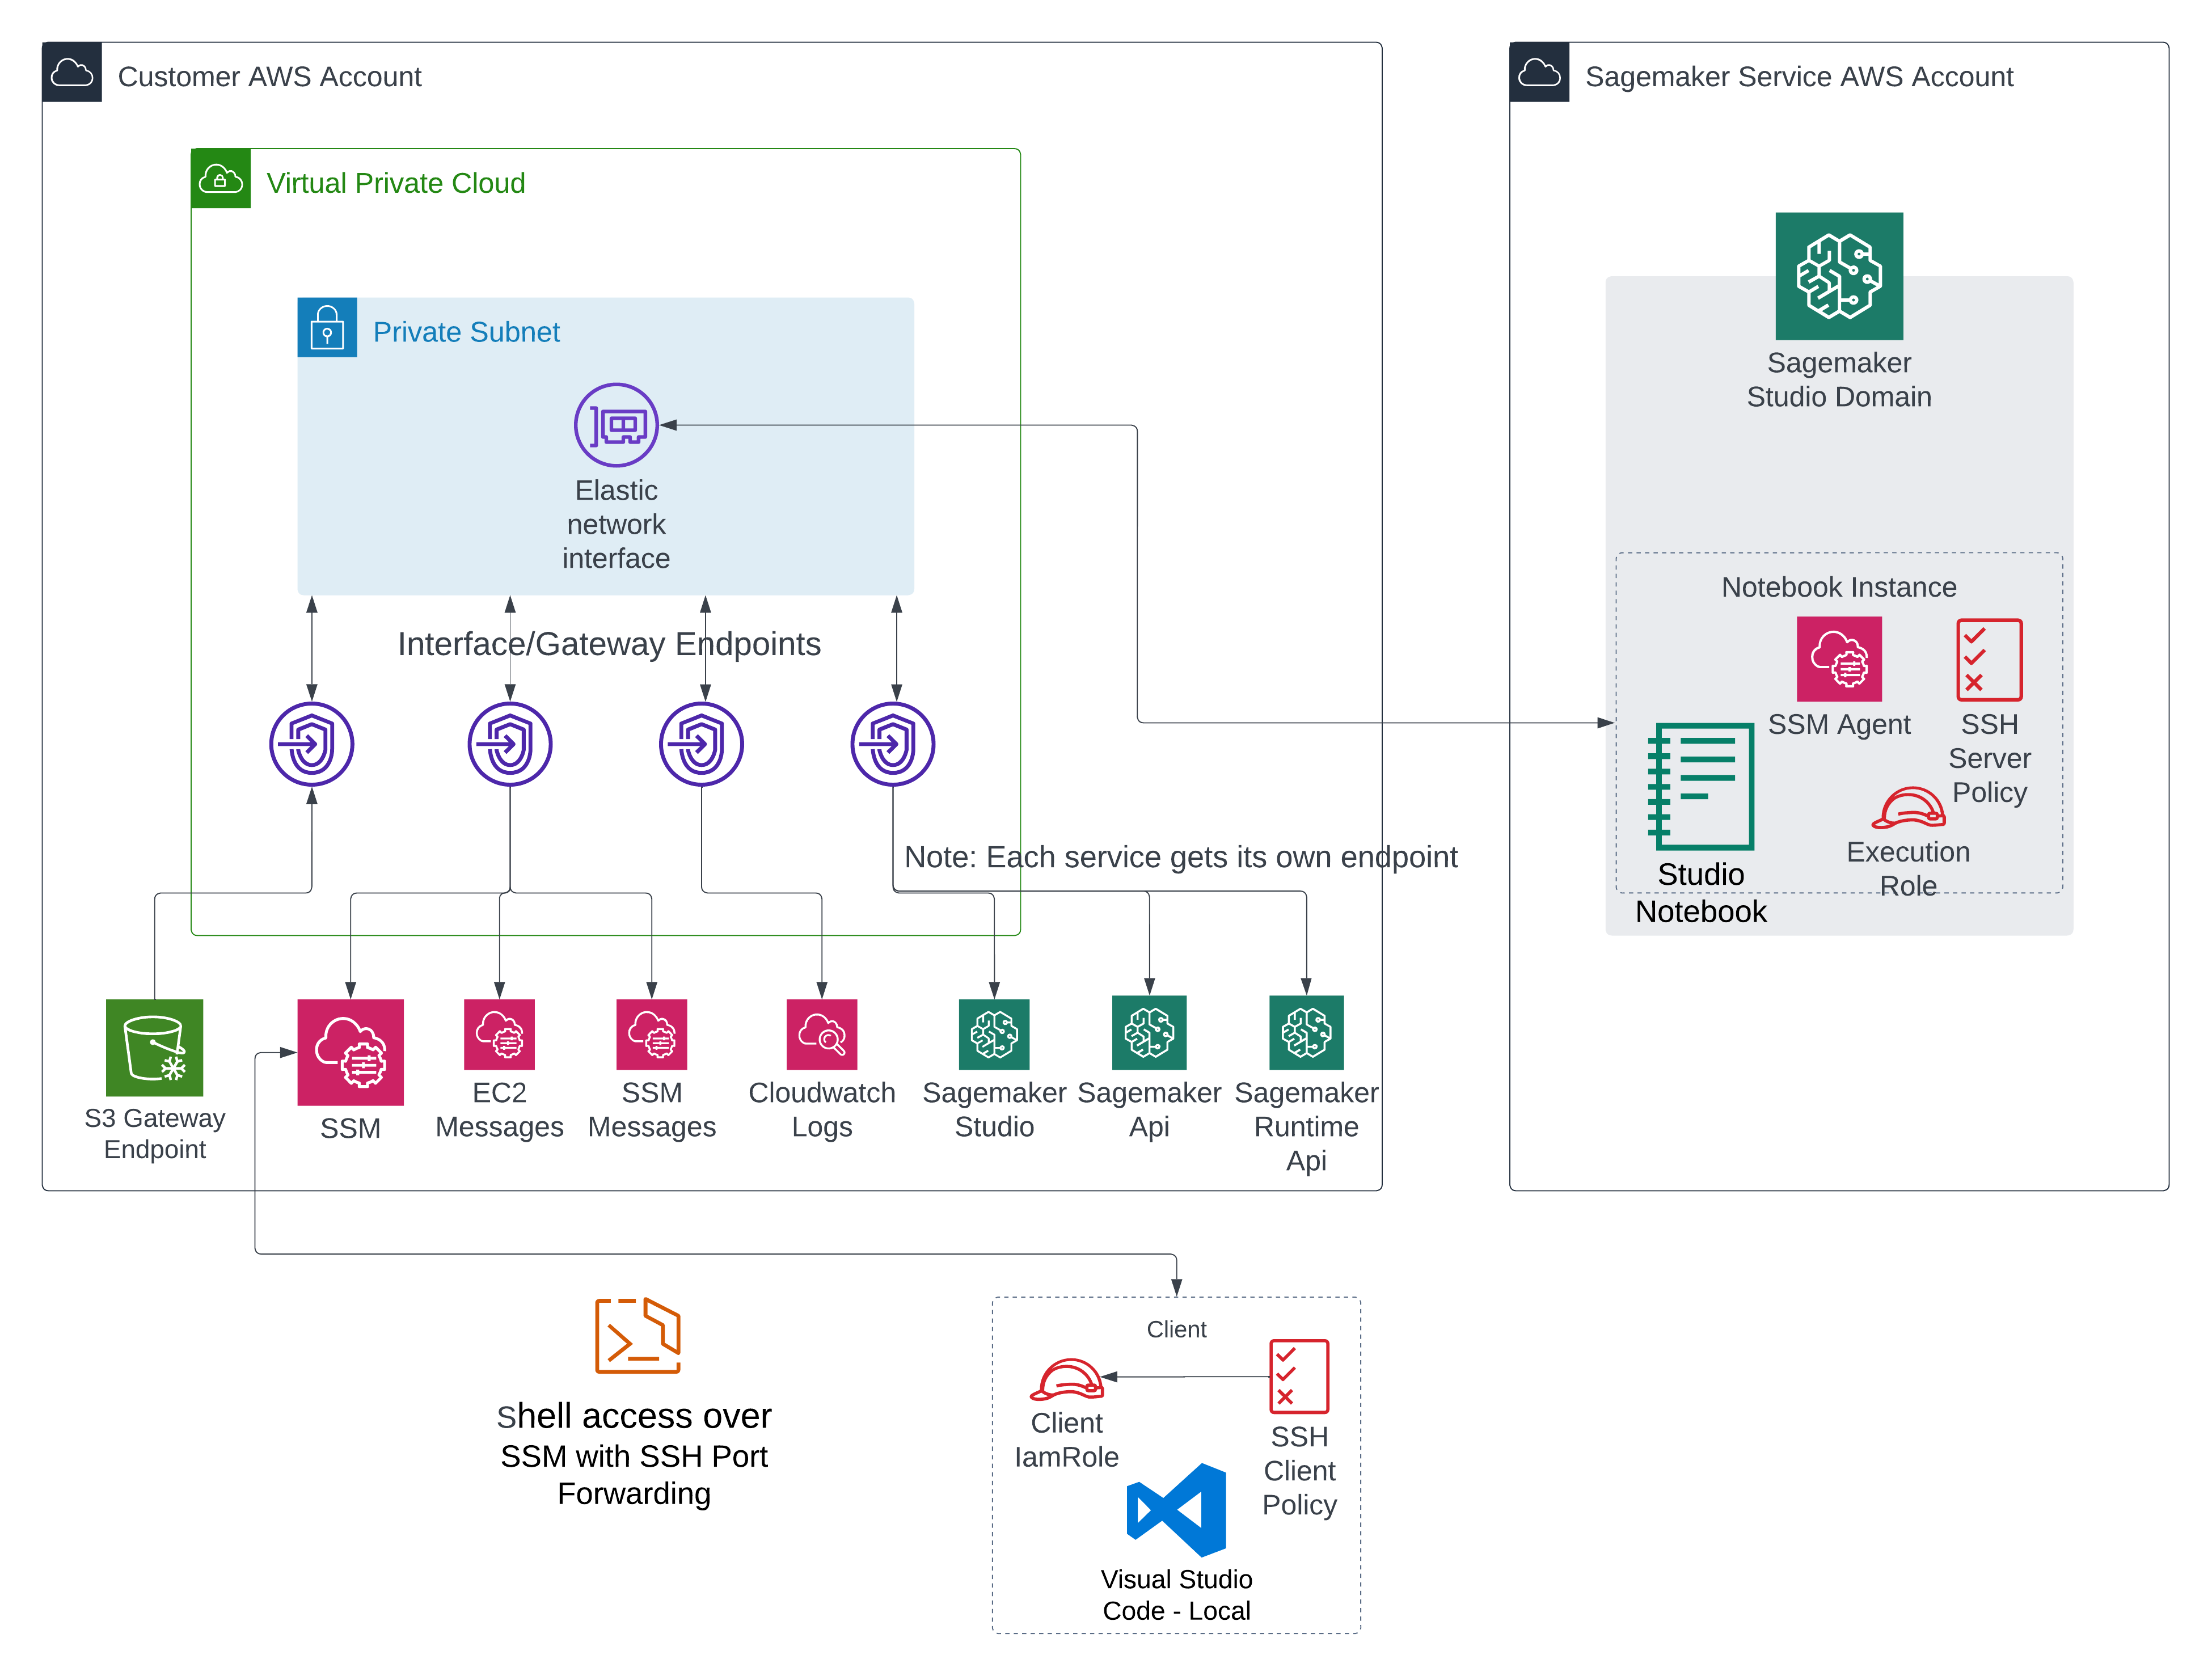
The general gist of this process is that a local user is interfacing with the AWS Systems Manager Service via HTTPS while an SSM agent on the Studio Notebook is also talking to the Systems Manager Service over a private interface endpoint. We will create an SSH connection within this outer HTTPS connection to remotely connect to the Sagemaker Studio notebook.
When using VPCOnly mode for your Studio Domain you need to ensure that you have all your interface endpoints and security groups set up correctly so that Sagemaker can communicate with all the necessary services.
Getting Started
(The following assumes you have properly set up an AWS environment by deploying the CDK in the demo repo or through some other means.)
- Since our Sagemaker Studio setup has no external internet access and we don’t have a proxy setup for PyPI, we will have to create our custom image with the necessary packages beforehand. We can then push this to an ECR repo and select this image when creating our Studio notebook. The image we use is based on a basic Python custom image provided by AWS.
Note: If you don’t want to go through the hassle of building the image and you can access PyPI and an OS package manager from within Sagemaker (i.e., you just want to see this process work and not with no external internet access) you can simply pip install sagemaker-ssh-helper on one of the available AWS provided sagemaker notebook images and copy the seelog.xml file from the repo onto your image at /etc/amazon/ssm/seelog.xml.
Below is the Dockerfile for our custom image. As you can see, all we are doing is installing some relatively standard libs and sagemaker-ssh-helper while also copying some seelog boilerplate for the ssm agent. The scripts we call in the RUN step are installed by sagemaker-ssh-helper .
FROM python:3.11.1

ENV STUDIO_LOGGING_DIR="/var/log/studio/"

RUN pip install --no-cache-dir --upgrade pip && \
    pip install --no-cache-dir ipykernel sagemaker-ssh-helper awscli boto3 numpy pandas && \
    python -m ipykernel install --sys-prefix

RUN mkdir -p /etc/amazon/ssm
COPY seelog.xml /etc/amazon/ssm/seelog.xml

RUN sm-setup-ssh configure && \
    sm-ssh-ide configure --ssh-only && \
    mkdir -p /var/log/amazon/ssm
2. The built image will need to be pushed to a private ECR repo before it can be used as a Sagemaker custom image.
In the demo repo, I have included a shell script in custom_images/python-base called build_tag_push.sh that should take care of everything from building and pushing your image to attaching it to your domain so it shows up as an option when you create a Studio Notebook instance.
Optionally, you can do this mostly via the console as well. But there are a few steps you will have to take. If this is the option you choose, it is covered more thoroughly in the remote-demo repo README.
3. The next step is to create a sagemaker user for our Studio Domain.
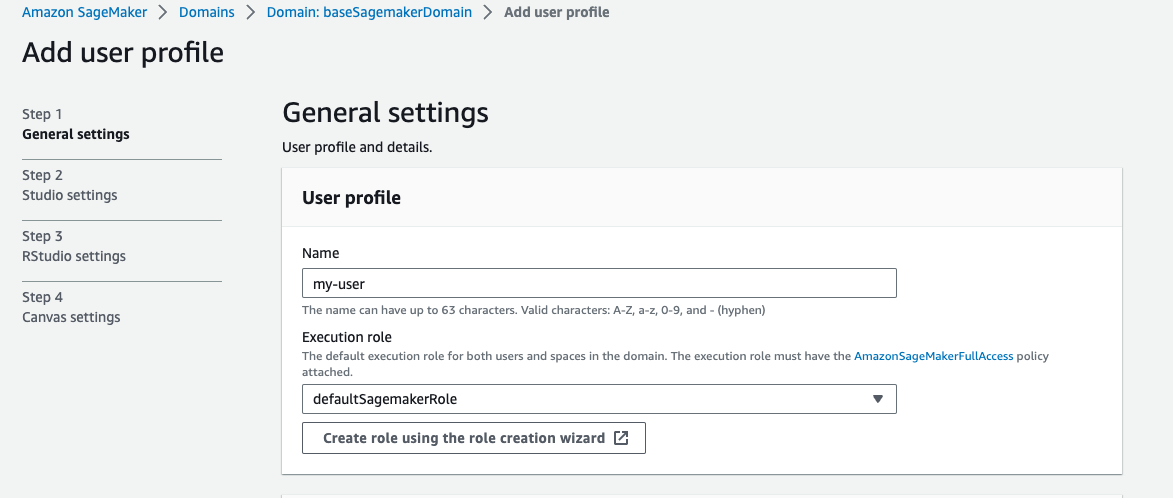
Most of the default settings are fine, just make sure that we attach the correct execution role for the user (the one we created called defaultSagemakerRole )
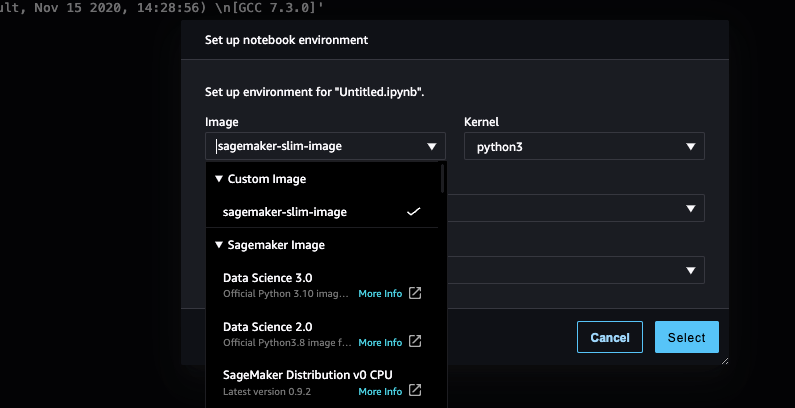
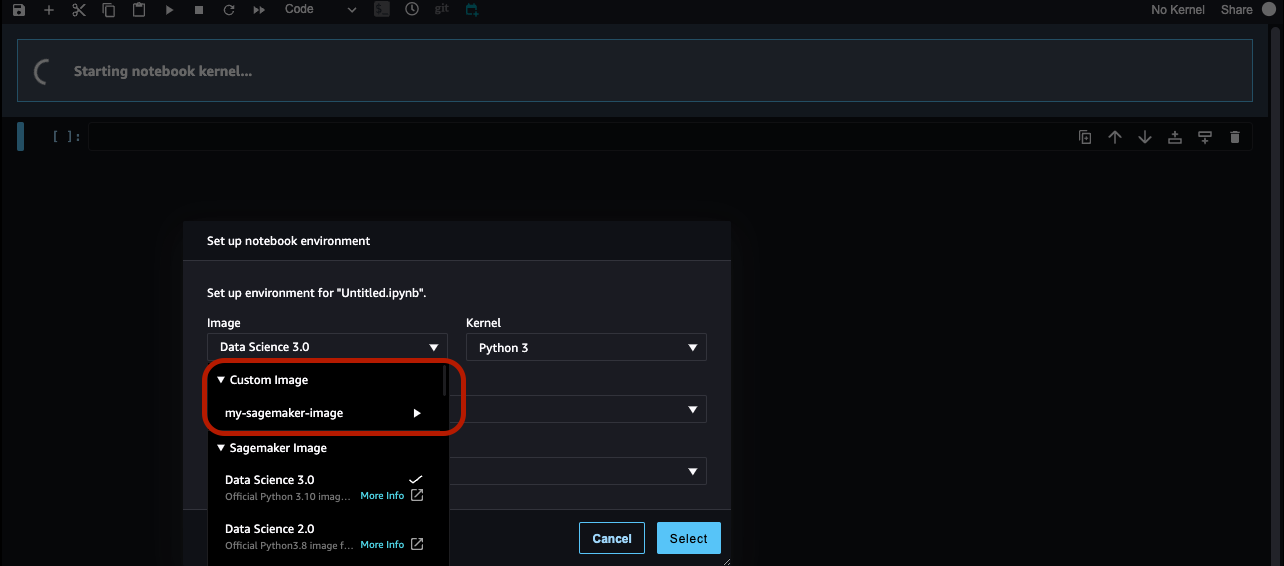
4. You can now launch Studio after it is finished loading. Creating a new notebook should show our custom image as a possible selection – go ahead and launch that.
5. Assuming that launches successfully, the next thing to do is run our setup script kernel_lc_config.sh to start the ssm-agent, ssh service, and register the instance with SSM.
The easiest way I have found to do this is via the Notebook Terminal (be careful because there is also the Studio terminal which is not what you want).
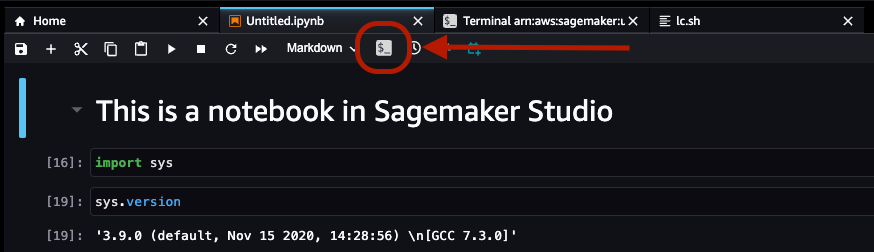
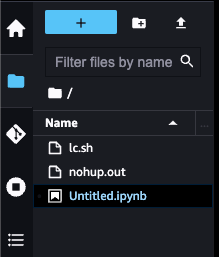
The kernel_lc_config.sh is in the root directory of the demo repo (it is also in the sagemaker-ssh-helper repo) and will have to be manually uploaded to Sagemaker Studio, which can be done using the upload icon in the Studio file browser. (Optionally: you can just copy and paste it from the code cell below).
Here is what the kernel_lc_config.sh looks like:
#!/bin/bash
set -eu
LOCAL_USER_ID="AIDACKCEVSQ6C2EXAMPLE:bob@SSO"
# Get metadata from /opt/ml/metadata/resource-metadata.json
# Assumes this is being run on sagemaker kernel gateway app
resource_metadata=/opt/ml/metadata/resource-metadata.json
if command -v jq >/dev/null 2>&1; then
LOCAL_USER_ID=$(jq --raw-output ".UserProfileName" $resource_metadata)
fi
echo "LOCAL_USER_ID is $LOCAL_USER_ID"
if [ -f /opt/sagemaker-ssh-helper/.ssh-ide-configured ]; then
echo 'kernel-lc-config.sh: INFO - SageMaker SSH Helper is already installed, remove /opt/sagemaker-ssh-helper/.ssh-ide-configured to reinstall'
else
pip3 uninstall -y -q awscli
pip3 install -q sagemaker-ssh-helper
fi
sm-ssh-ide get-metadata
which python3
SYSTEM_PYTHON_PREFIX=$(python3 -c "from __future__ import print_function;import sys; print(sys.prefix)")
export JUPYTER_PATH="$SYSTEM_PYTHON_PREFIX/share/jupyter/"
sm-ssh-ide configure
sm-ssh-ide set-local-user-id "$LOCAL_USER_ID"
sm-ssh-ide init-ssm
sm-ssh-ide stop
sm-ssh-ide start
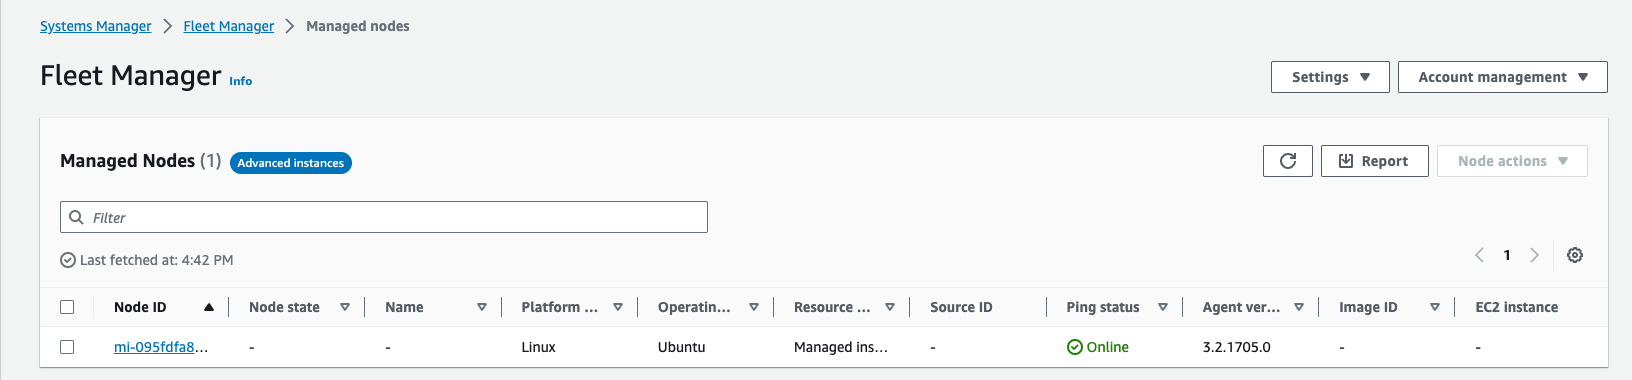
nohup sm-ssh-ide ssm-agent &6. Executing this successfully on your notebook instance should lead to a new managed instance in Systems Manager > Fleet Manager in the AWS console
7. The final steps involve some minor local configuration before we attempt to connect remotely to the Sagemaker notebook.
We will need to take note of 3 things:
- The domain id: something like
d-pgejs34klksd - user profile name: the name of our Sagemaker user
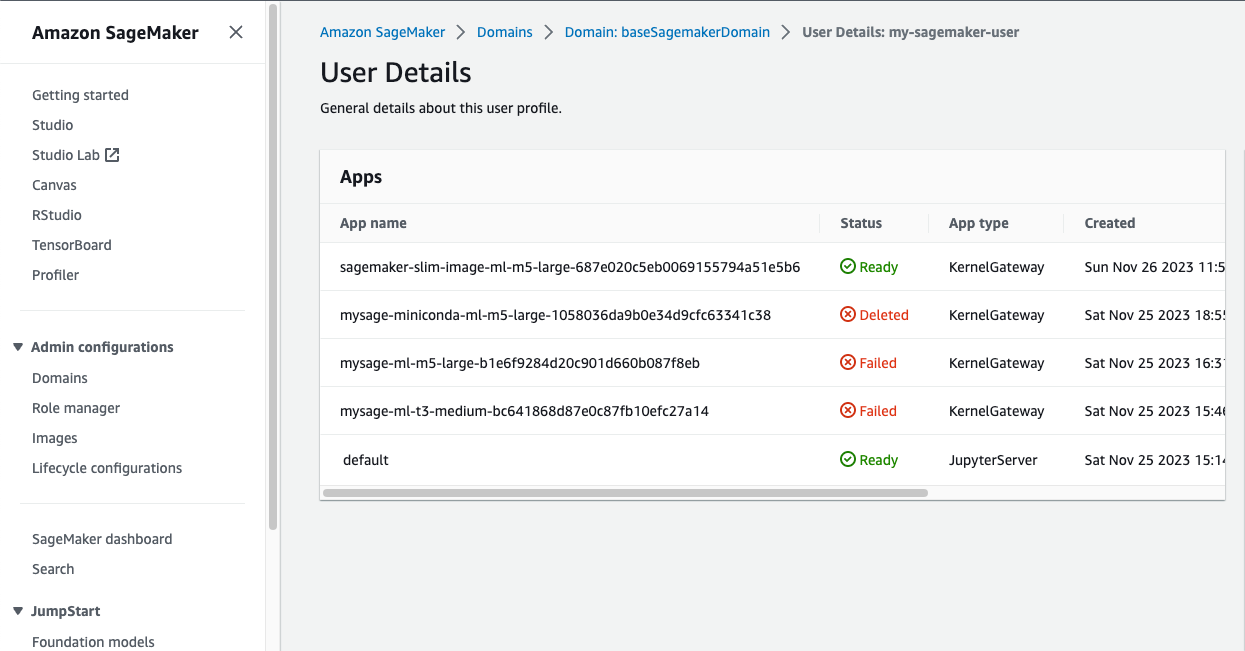
- the kernel gateway app name: my-sagemaker-image-ml-t3-medium-ae47… (can be found under your user in the Sagemaker console)
8. Go to a local terminal on your machine and ensure that you have run pip install sagemaker-ssh-helper into your current Python environment and then run these commands in order
sm-local-configure
sm-local-ssh-ide set-domain-id [domain_id]
sm-local-ssh-ide set-user-profile-name [user_profile_name]
sm-local-ssh-ide connect [kernel_gateway_app_name]
For the last command, you will want to ensure that you have the proper credentials for the account you want set as the [default] profile in ~/.aws/credentials . The sm-local-ssh-ide command does not support a --profile argument.
The end result should be a remote terminal as root into your Sagemaker Studio instance.

This connection must remain open while you use the VS Code Remote extension to connect to the host. (This can be modified to circumvent this, but you will need to slightly deviate from the sagemaker ssh helper library).
Below is the same gif from the start of the article demonstrating remoting into the notebook instance.
Installing extensions on the remote can take a few minutes.
Conclusion
This approach can greatly improve the developer experience within Sagemaker Studio Classic. You can use the VS Code functionality you have come to love while developing within Sagemaker Studio.
Although many data science developers are familiar with JupyterLab, having to juggle multiple development environments is just one more thing adding to our cognitive overhead. Any time we can abstain from thinking about, fixing, or configuring our tooling, is more time we can spend on the work that matters.
It is not perfect, but for developers who would like to use VS Code as their IDE and keep their configs, it is hard to beat.
A big additional bonus is that this can also be configured to work with PyCharm as well. Since Sagemaker Studio Code Editor is modified open-source VS Code, this might not be ideal (the juggling IDEs thing again).
Finally, even considering the changes to Sagemaker Studio, if you still have no external internet access in your VPC, the ability to upload extensions on-the-fly via scp might be the most powerful part of this setup. Each developer can control their experience to a much larger degree.